
Pilates Equipment in SCI & Neuro rehab
Features, benefits & comparisons for client cases
I first encountered Pilates—and its incredibly well-designed equipment—in 2014 during a workshop on Neuro Pilates. At that point, I had been working with spinal cord injury (SCI) and other neurological conditions for about four years in an activity-based therapy (ABT) setting using traditional neuro-rehab tools: standing frames, FES bikes, Total Gyms, robotic gait trainers.
But something about this equipment always felt off: I was never fully satisfied with how these tools were designed to support my SCI rehab clients.
These tools, while helpful, were often too rigid, too prescriptive in their setups, too limiting in motion. They didn’t allow for the subtle movement exploration that’s essential for nervous system learning. As neuroscientist Andrew Huberman has pointed out, making safe errors is critical for motor learning.
Why Traditional SCI Rehab Equipment Falls Short
Most traditional SCI rehab equipment locks the body into a narrow plane of movement. It’s designed to keep people safe, but that often comes at the expense of dynamic, self-directed exploration. In rehab, that’s a big loss.
So when I got a taste of what Pilates equipment could offer—both for my SCI clients’ bodies and my own— it clicked. By contrast, Pilates equipment creates opportunity:
Dynamic support for a range of body positions
Adjustable resistance that meets people where they are
Elastic recoil that resonates with fascia and muscles
Multi-planar movement pathways to promote functional integration of parts
Immediate kinesthetic feedback, more effective than verbal cues alone
Compact versatility—a single piece can replace multiple rehab tools
Back at the ABT clinic, I didn’t have access to Pilates equipment, but I was lucky that one of my coursemates invited me to their Pilates studio on my off days to explore it further with clients.
It didn’t take long before I left my job at the ABT clinic and transitioned full-time into the studio. The Pilates equipment was just that good at supporting the kind of neurorehabilitation outcomes I was striving for. I knew I needed that kind of equipment to best support my client’s development.

Why Pilates Equipment Works for SCI Rehab
It makes sense why a lot of traditional SCI rehab equipment is so limiting—safety is critical, after all.
But here’s the downside: most of these tools lock the body into a single plane of movement, which prevents athletes from developing the internal stability needed for true mobility. You can be over-supported just as much as under-supported, thwarting true motor development.
The magic lies in finding that sweet spot—enough guidance for safety and enough space for exploration.
Pilates equipment creates an ideal balance between freedom and support. It allows both micro-adjustments in posture and large-scale movement exploration, teaching the body to self-organize and stabilize.
Small Package, BIG IMPACT
More than a decade later, I run a solo practice serving people with spinal cord injuries—and I almost exclusively use Pilates equipment (plus the floor, of course 😉).
In just 200 square feet, I’ve created a highly functional studio with a $12K investment in equipment. That’s a fraction of what most neuro-rehab clinics spend on their equipment.
Bottom line: Pilates equipment delivers BIG impact in a small package.
This article is for anyone—therapists, individuals with SCI, caregivers—who wants to understand how to choose and use Pilates equipment effectively in spinal cord injury rehab.
This article is meant to help the spinal cord injury community (therapists, caregivers, and individuals alike) learn how to optimize Pilates equipment for SCI rehab. Whether you’re outfitting a clinic or creating an adaptive home setup, the goal is to make informed, functional choices.
For each of the four key pieces of equipment, I’ll break down:
What each piece of equipment does well
How it supports motor learning in someone with a spinal cord injury or neuro-motor challenges
Best-use and practices for different injury levels and goals
Find all the equipment listed in this blog at Pilates.com
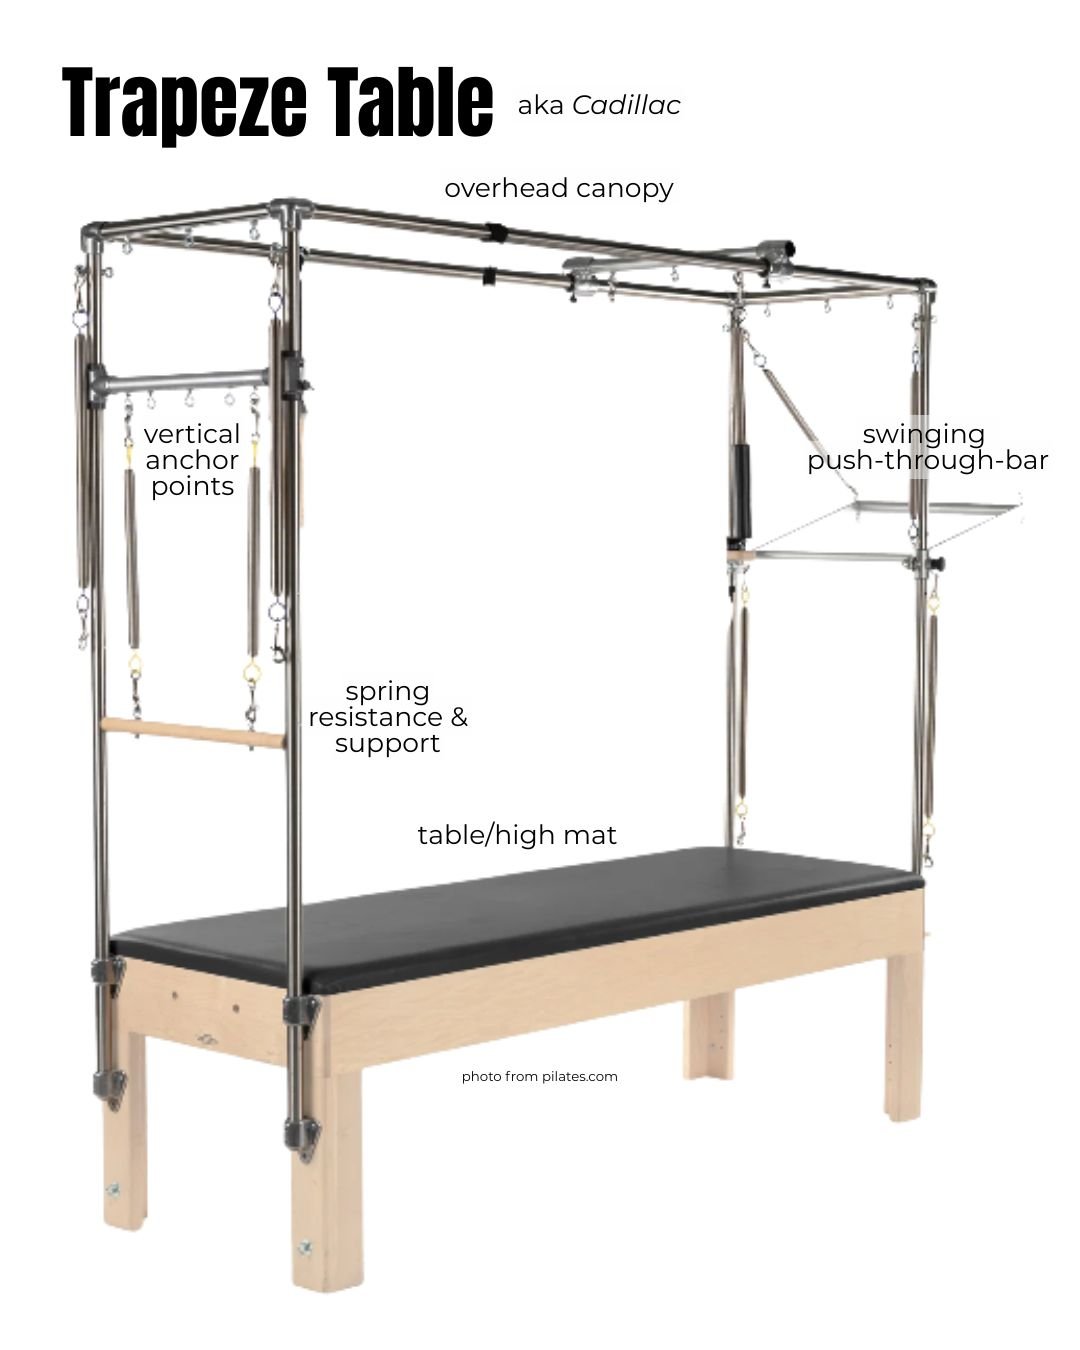
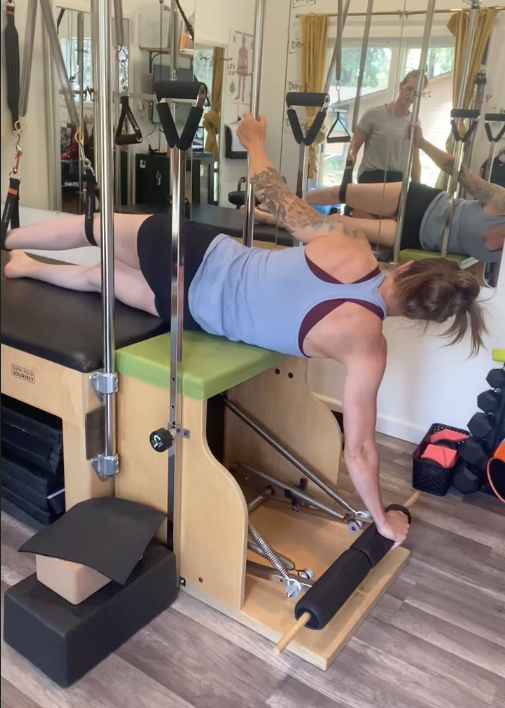
Trapeze Table
The Trapeze Table—also known as the Cadillac—is the cornerstone of my equipment setup. With horizontal and vertical bars, endless spring attachment points to support any body position, and a high surface for easy transfers, it’s the most versatile tool I use.
Key Features
Overhead & vertical bars for a variety of spring anchor points to support any body position
Push-through bar (PTB) offers an arcing pathway
Upright posts give clients something to hold onto during kneeling or standing work
Higher surface height allows for easier transfers and better ergonomics for the trainer
How the Trap Table supports movement exploration
The Trap Table is best used in SCI rehab programming for offloading the body with springs, creating a sense of weightlessness. Clients often describe it as “feeling like water.” That support enables:
And it’s not just the client who benefits from this offloading—suspending the body means less physical strain on me (the clinician), which frees up my energy to focus on coaching, cueing, and problem-solving in real time.
The push-through-bar’s arcing pathway is great for informing shoulder mechanics - a great kinesthetic teacher for shoulder protraction and upward rotation (essential for Spiral Line!). It’s subtle swing also allows access for precision in spinal mobility, and postural integration.
One little trick I love: I place a mirror to the canopy above, so clients in supine or side-lying positions can see their whole body moving. It’s a powerful way to reinforce body awareness and alignment, especially for clients with limited proprioception.


The Trap Table is Best Suited For
Honestly? Pretty much every client. Its modular design means I can get creative and customize setups for all levels and injury presentations.
I use it most often with clients who have cervical spinal cord injuries, especially in combination with floor work. The Trap Table offers tons of ways to support the head, trunk, and limbs safely while still allowing meaningful movement.
Considerations in practice
Because it’s so customizable, setups aren’t exactly plug-and-play. It takes some trial and error to dial in exactly what a specific client needs on any given day.
The narrow width of the table can make it tricky for some clients—especially those with higher cervical injuries—to roll over without help.
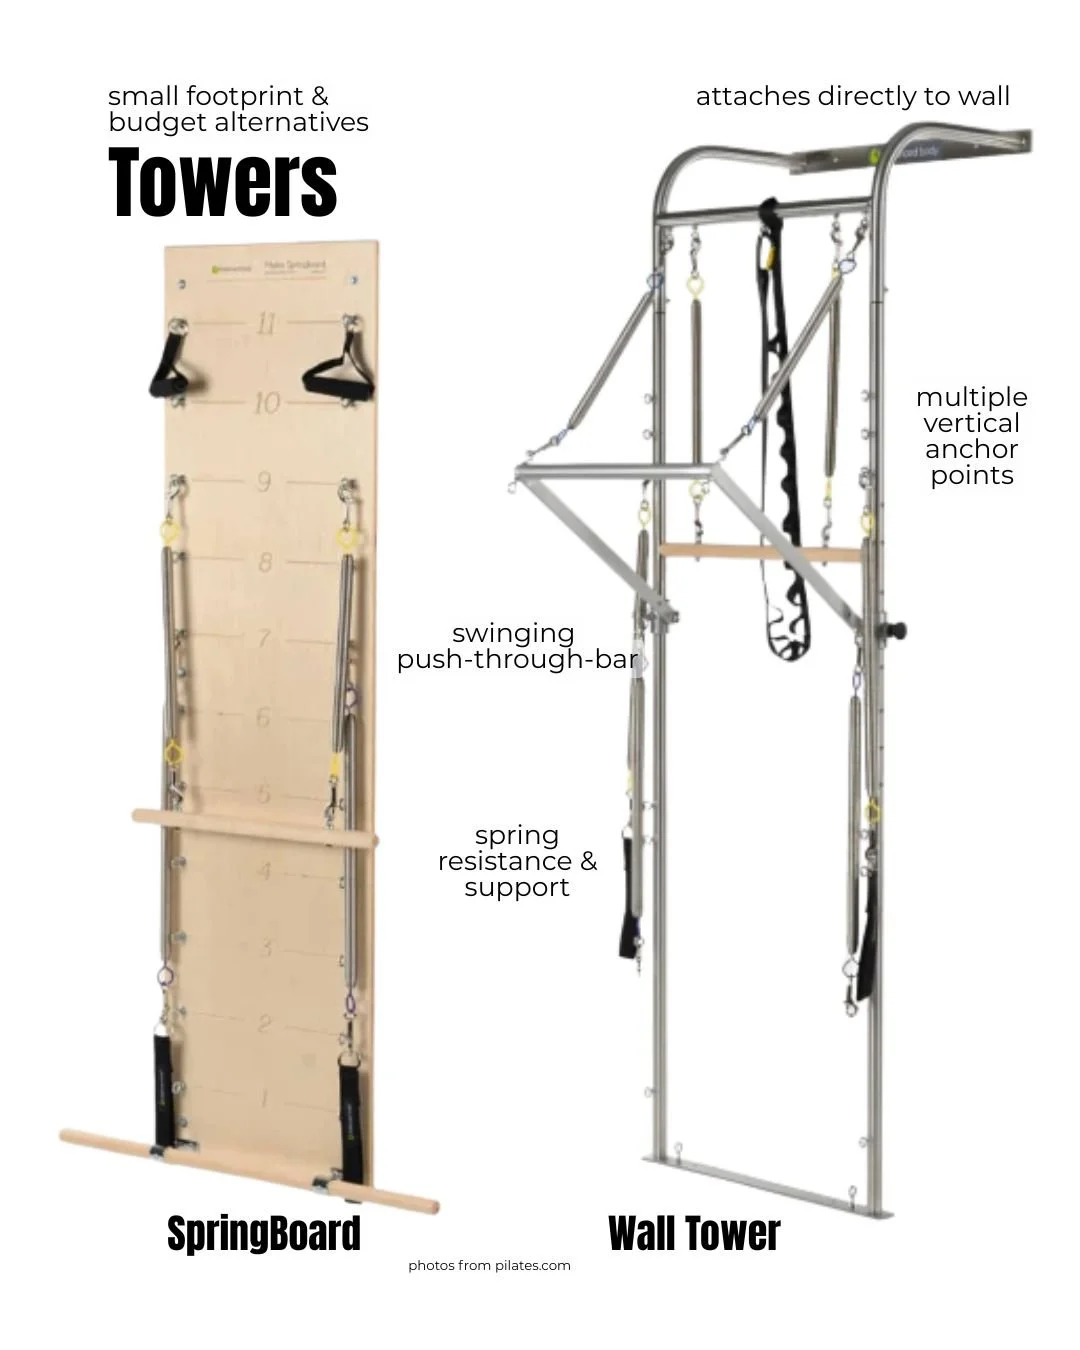
Another comparable option to the Trap Table is the Wall Tower unit, or even the SpringBoard, which offers a variety of attachment points as well as a push-through-bar at a much lower price point and footprint. With these units, however, you lose the overhead canopy.
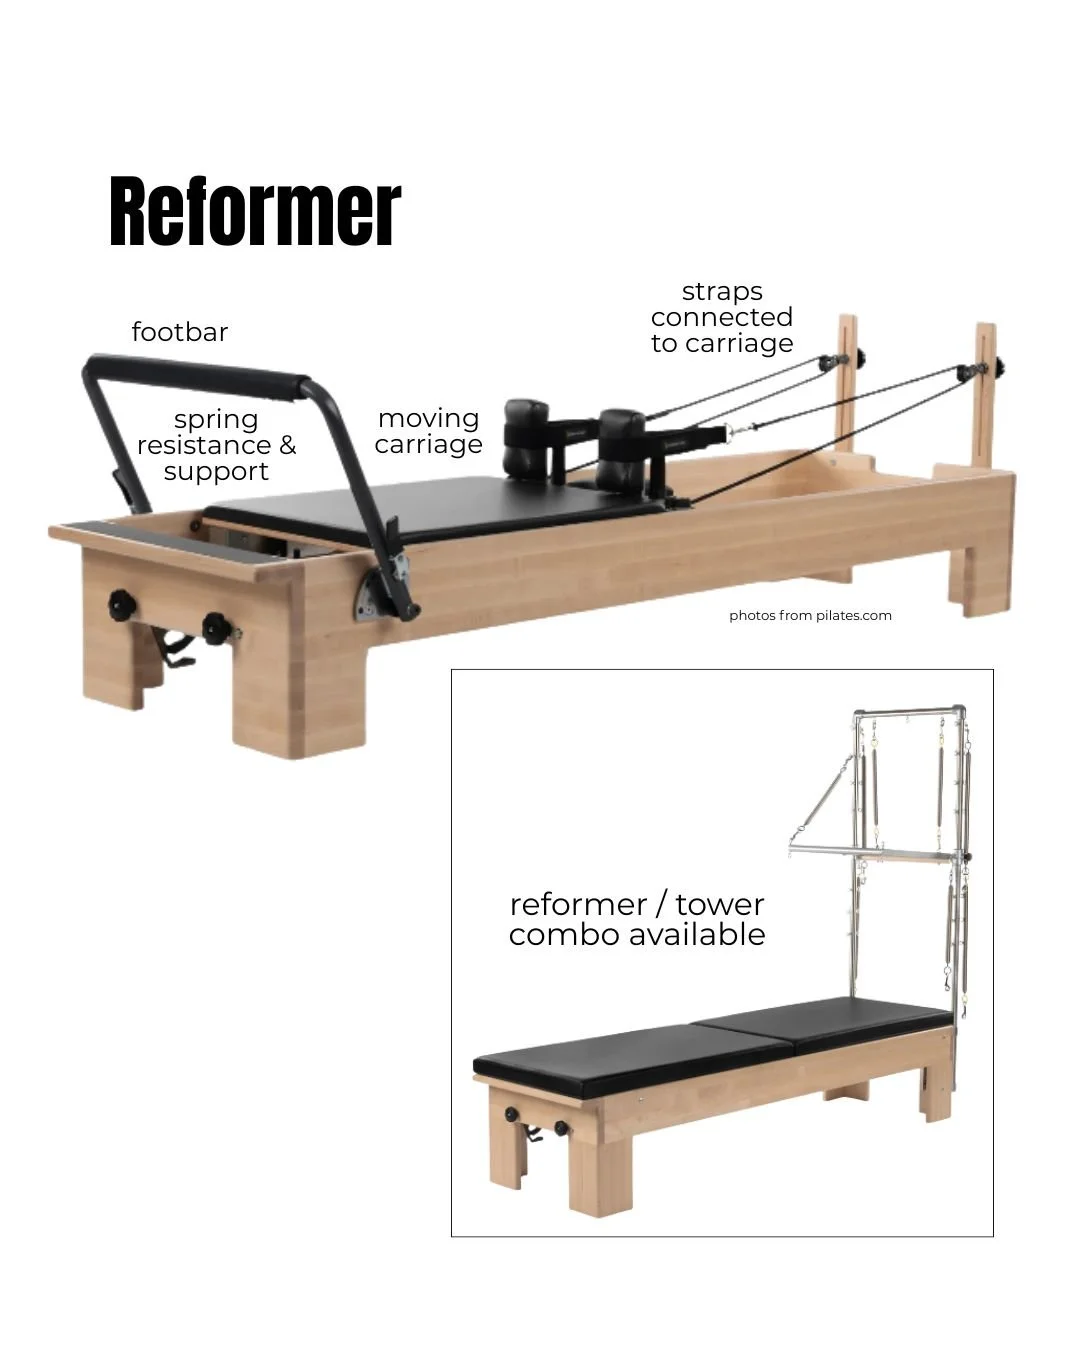
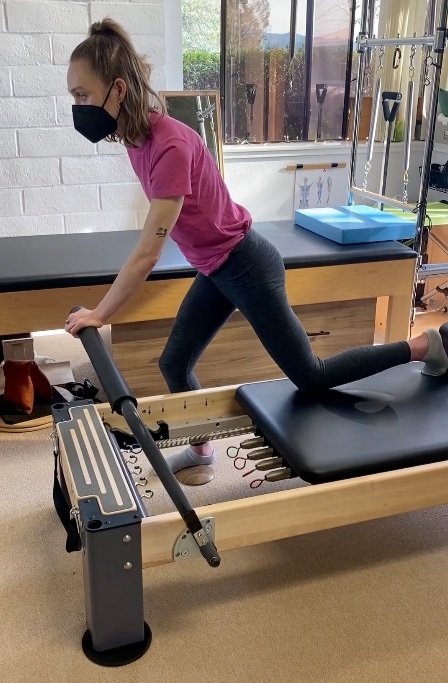
Reformer
When most people think of Pilates, they picture the Reformer—and for good reason. It’s probably the most iconic piece of Pilates equipment.
But if I’m being honest? It’s actually one of my least-used tools in spinal cord injury rehab. I’ll explain why in a bit—but first, let’s break down what it does well.
In SCI settings, I often see the Reformer used like a glorified leg press or Total Gym. The spring-loaded carriage lets clients simulate weight-bearing through the legs via the footbar or jumpboard. That’s a great start on this piece of equipment, but it barely scratches the surface of what this equipment can offer for movement integration.
What sets the Reformer apart is how it challenges translational movement through space—something that’s especially important for postural training. Unlike pulling resistance bands on a static surface (where the body stays still), the Reformer’s pulley system causes the whole carriage—and the user’s body—to move as they pull on the straps. This forces activation through the shoulders, torso, and pelvis to maintain balance on the moving surface.
The springs under the carriage can either assist or resist motion, depending on the direction of force. That spring-based challenge, combined with a moving platform, makes the Reformer a powerful tool for core stability, control, and proprioceptive training—when it’s used with the right person.
Key Features
Moving carriage challenges dynamic postural stability
Shoulder blocks help keep the body aligned and secure
Straps and springs provide variable resistance for both upper and lower body work
Foot platform options (like the narrow footbar or jumpboard) allow for foot integration and power output
Spring tension can be adjusted to support, resist, or load the body during movement or stretching
How the Reformer supports movement exploration
One of the most unique things about the Reformer is that it offers real-time feedback on coordination and balance, especially through the head-tail axis. Any glitch in movement or stability will be acutely highlighted by “the wobble”!
In supine leg work, clients can press against the footbar with partial body weight, making it easier to activate lower extremities with less strain.
Add the jumpboard, and clients can train for jumping, hopping, and even running mechanics—with far less impact and injury risk.
For clients with tight hip flexors or high tone, the Reformer offers a unique opportunity for supported stretching. For example, a lunge stretch becomes more accessible (and less likely to trigger a spasm) when springs help hold the body in position.
Want to upgrade a traditional hamstring stretch? Add light tension on the straps during a straight leg raise for an active, loaded mobility drill that improves neuromuscular control.


The Reformer is Best Suited For
Clients who can independently transfer to a lower surface and maintain a stable seated position (usually around T10 SCI and below)
Ambulatory SCI clients with L1 or lower injuries who want to refine and balance leg activation
Clients with moderate tone who benefit from supported, dynamic stretching
Individuals ready for translational, full-body coordination work
Considerations in practice
The moving carriage and spring-loaded straps add a real fall risk, especially during eccentric (lengthening) movements. I always make sure clients move slow and controlled, and I’m never far away to spot.
The Reformer is not ideal for clients who can’t sit upright without propping back, or against forces. A quick test: Can they sit on a mat and pull on a resistance band without falling over? If not, they may struggle on the Reformer.
Transferring in and out of supine positions can be awkward, especially navigating shoulder blocks and the footbar.
Consider the model: “Clinical Reformers” are higher off the ground for easier transfers. Standard Reformers are often lower for home use and storage.
And yes—quality matters. Budget Reformers (like from Walmart!) often have poor spring quality, jerky glide, and short lifespans. You truly get what you pay for here.
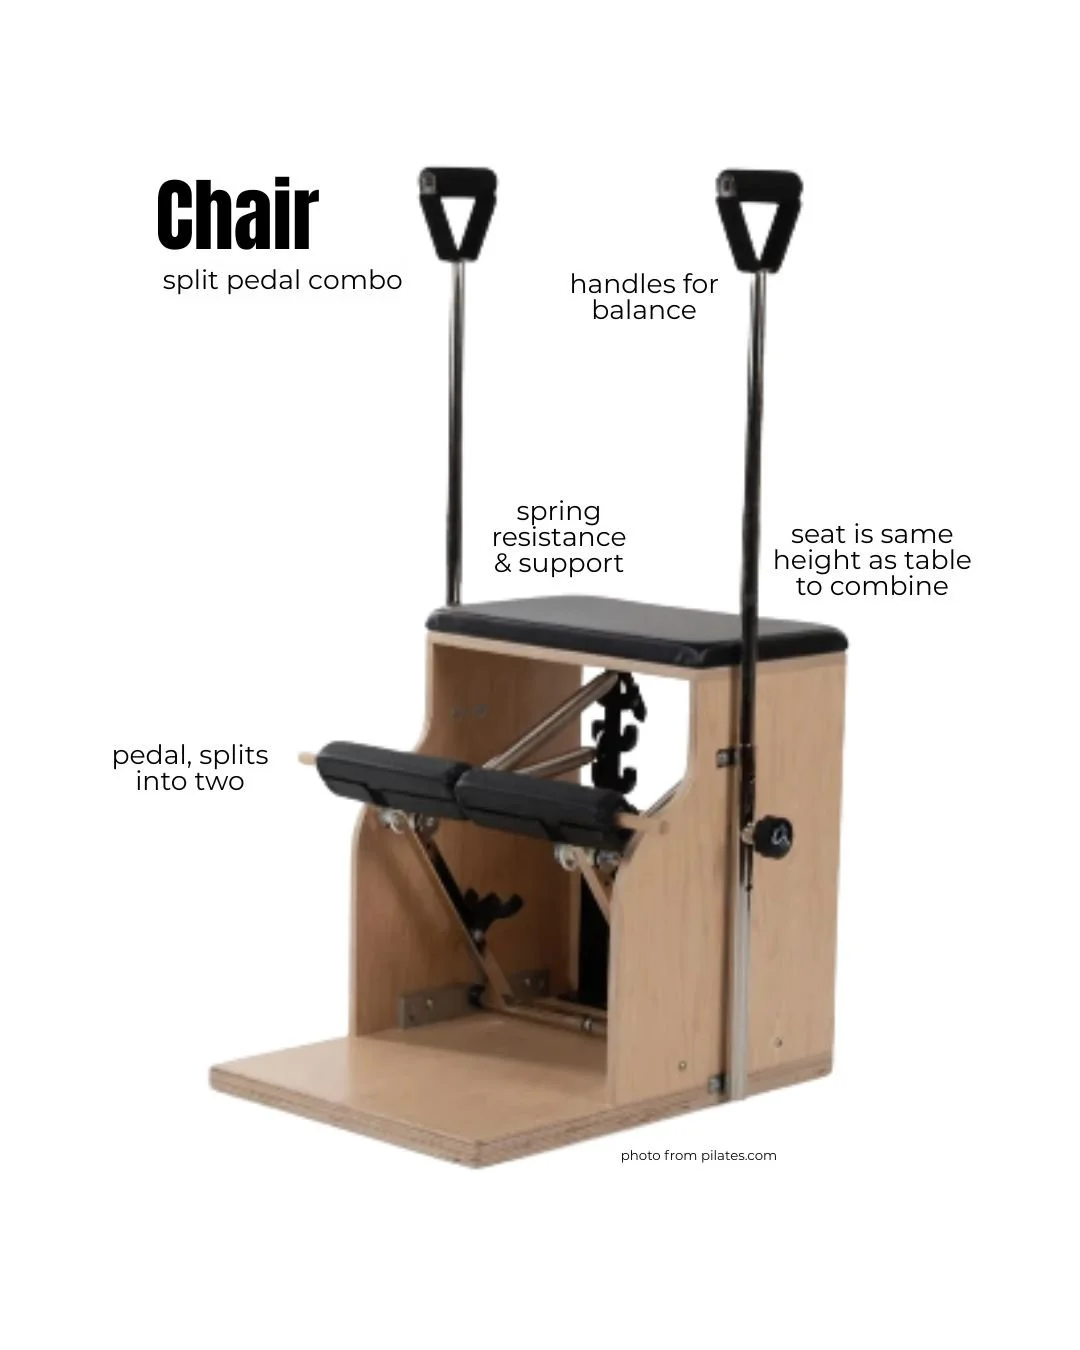
Chair
This small, unassuming piece of equipment might pack the biggest punch because it has a not-so-subtle way of telling you just how much more stability you need.
The story goes that Joe Pilates designed the Chair for his New York City students who needed something compact enough to fit in small apartments. The name fits: when not in use, it could double as a living room armchair with a few cushions tossed on top.
Don’t let its size and lack of flair fool you. The Chair’s spring-loaded pedal delivers powerful feedback—whether supporting a lift or resisting a push—in a wide variety of positions: prone, seated, quadruped, kneeling, or standing.
Key Features
Spring tension can be adjusted using hook placements to increase or decrease resistance/support
Split-pedal design allows for right/left/alternating movement patterns
Handles offer support for balance and posture
Seat height aligns with the Trapeze Table for easy combination of equipment
Built-in wheels make it easy to move around your space
How the Chair supports movement exploration
The pedal’s arcing path (unlike a strictly vertical or horizontal motion) better mimics natural joint mechanics, especially at the hips and shoulders. Whether lifting in a prone position or pressing down while standing, this arc supports smoother, more functional movement.
The upward resistance from the spring creates a gentle unweighting sensation, particularly helpful in movements like Swan Lift (aka Chest Lift II from From the Ground Up). It gives the body the chance to eccentrically control the lift through the back, glutes, and spine.
When pressing into the pedal, it quickly becomes clear that everything else needs to stabilize to generate force. It’s a brilliant kinesthetic feedback tool for building full-body control and integration.
The split-pedal feature adds a new layer of complexity, inviting alternating leg or arm motions to challenge coordination and cross-body activation.

The Chair is Best Suited For
Anyone looking to activate spinal extensors and glutes—just be mindful of suprapubic catheters in prone work
Building input and coordination for seated marching patterns
Developing quadruped or standing stability
Training single-leg balance and control
Those looking for a compact but powerful addition to their adaptive Pilates practice
Considerations in practice
While the Chair isn’t the most versatile piece of Pilates equipment, it shines in stability-focused training. For those working on upright control, it’s a powerhouse. Plus, it’s relatively affordable—I got mine used for about $600—and its small footprint makes it easy to add to a studio or home setup.
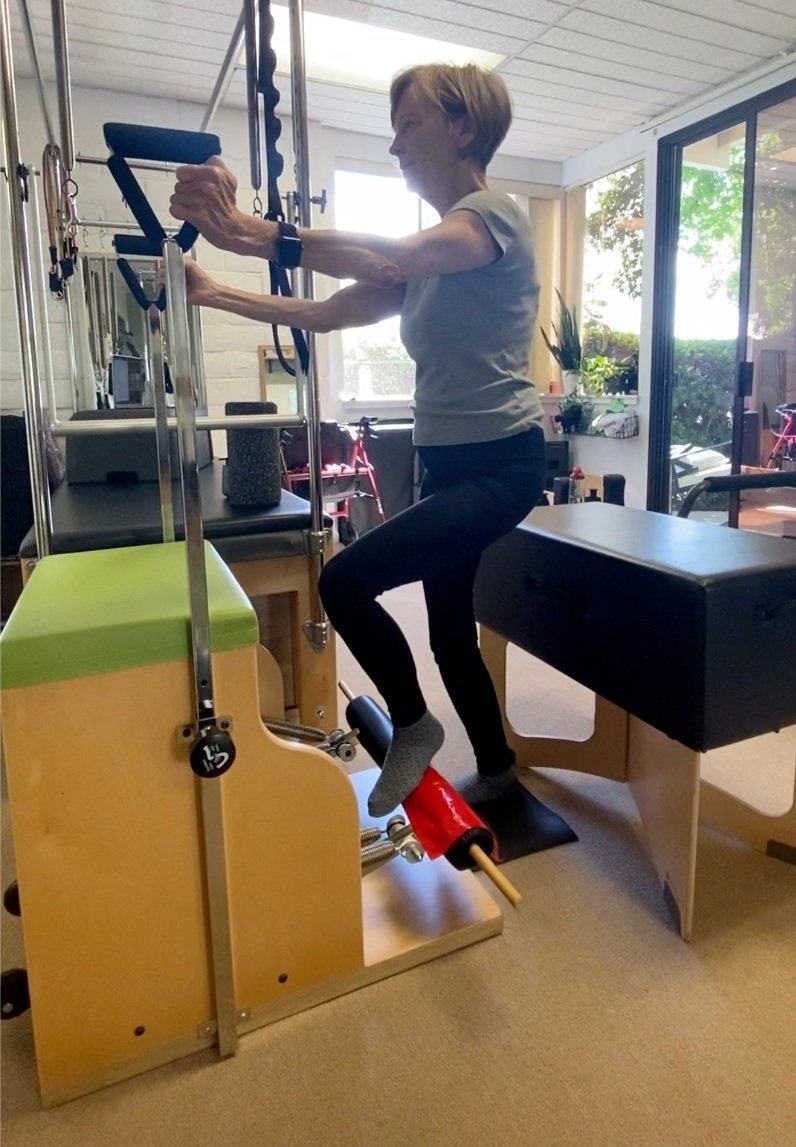
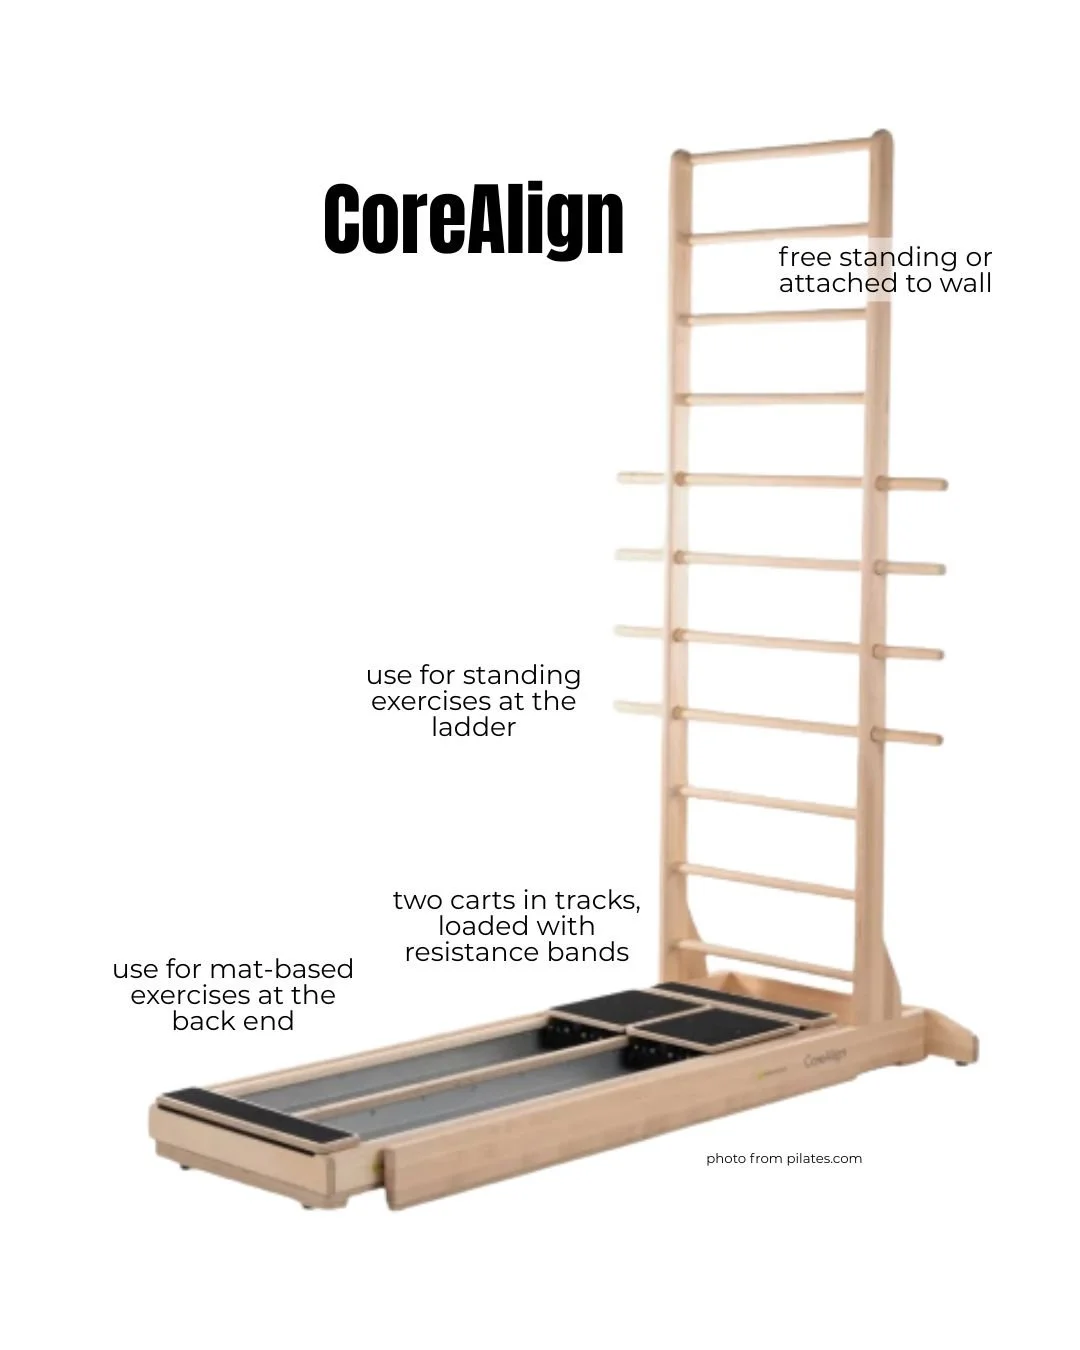
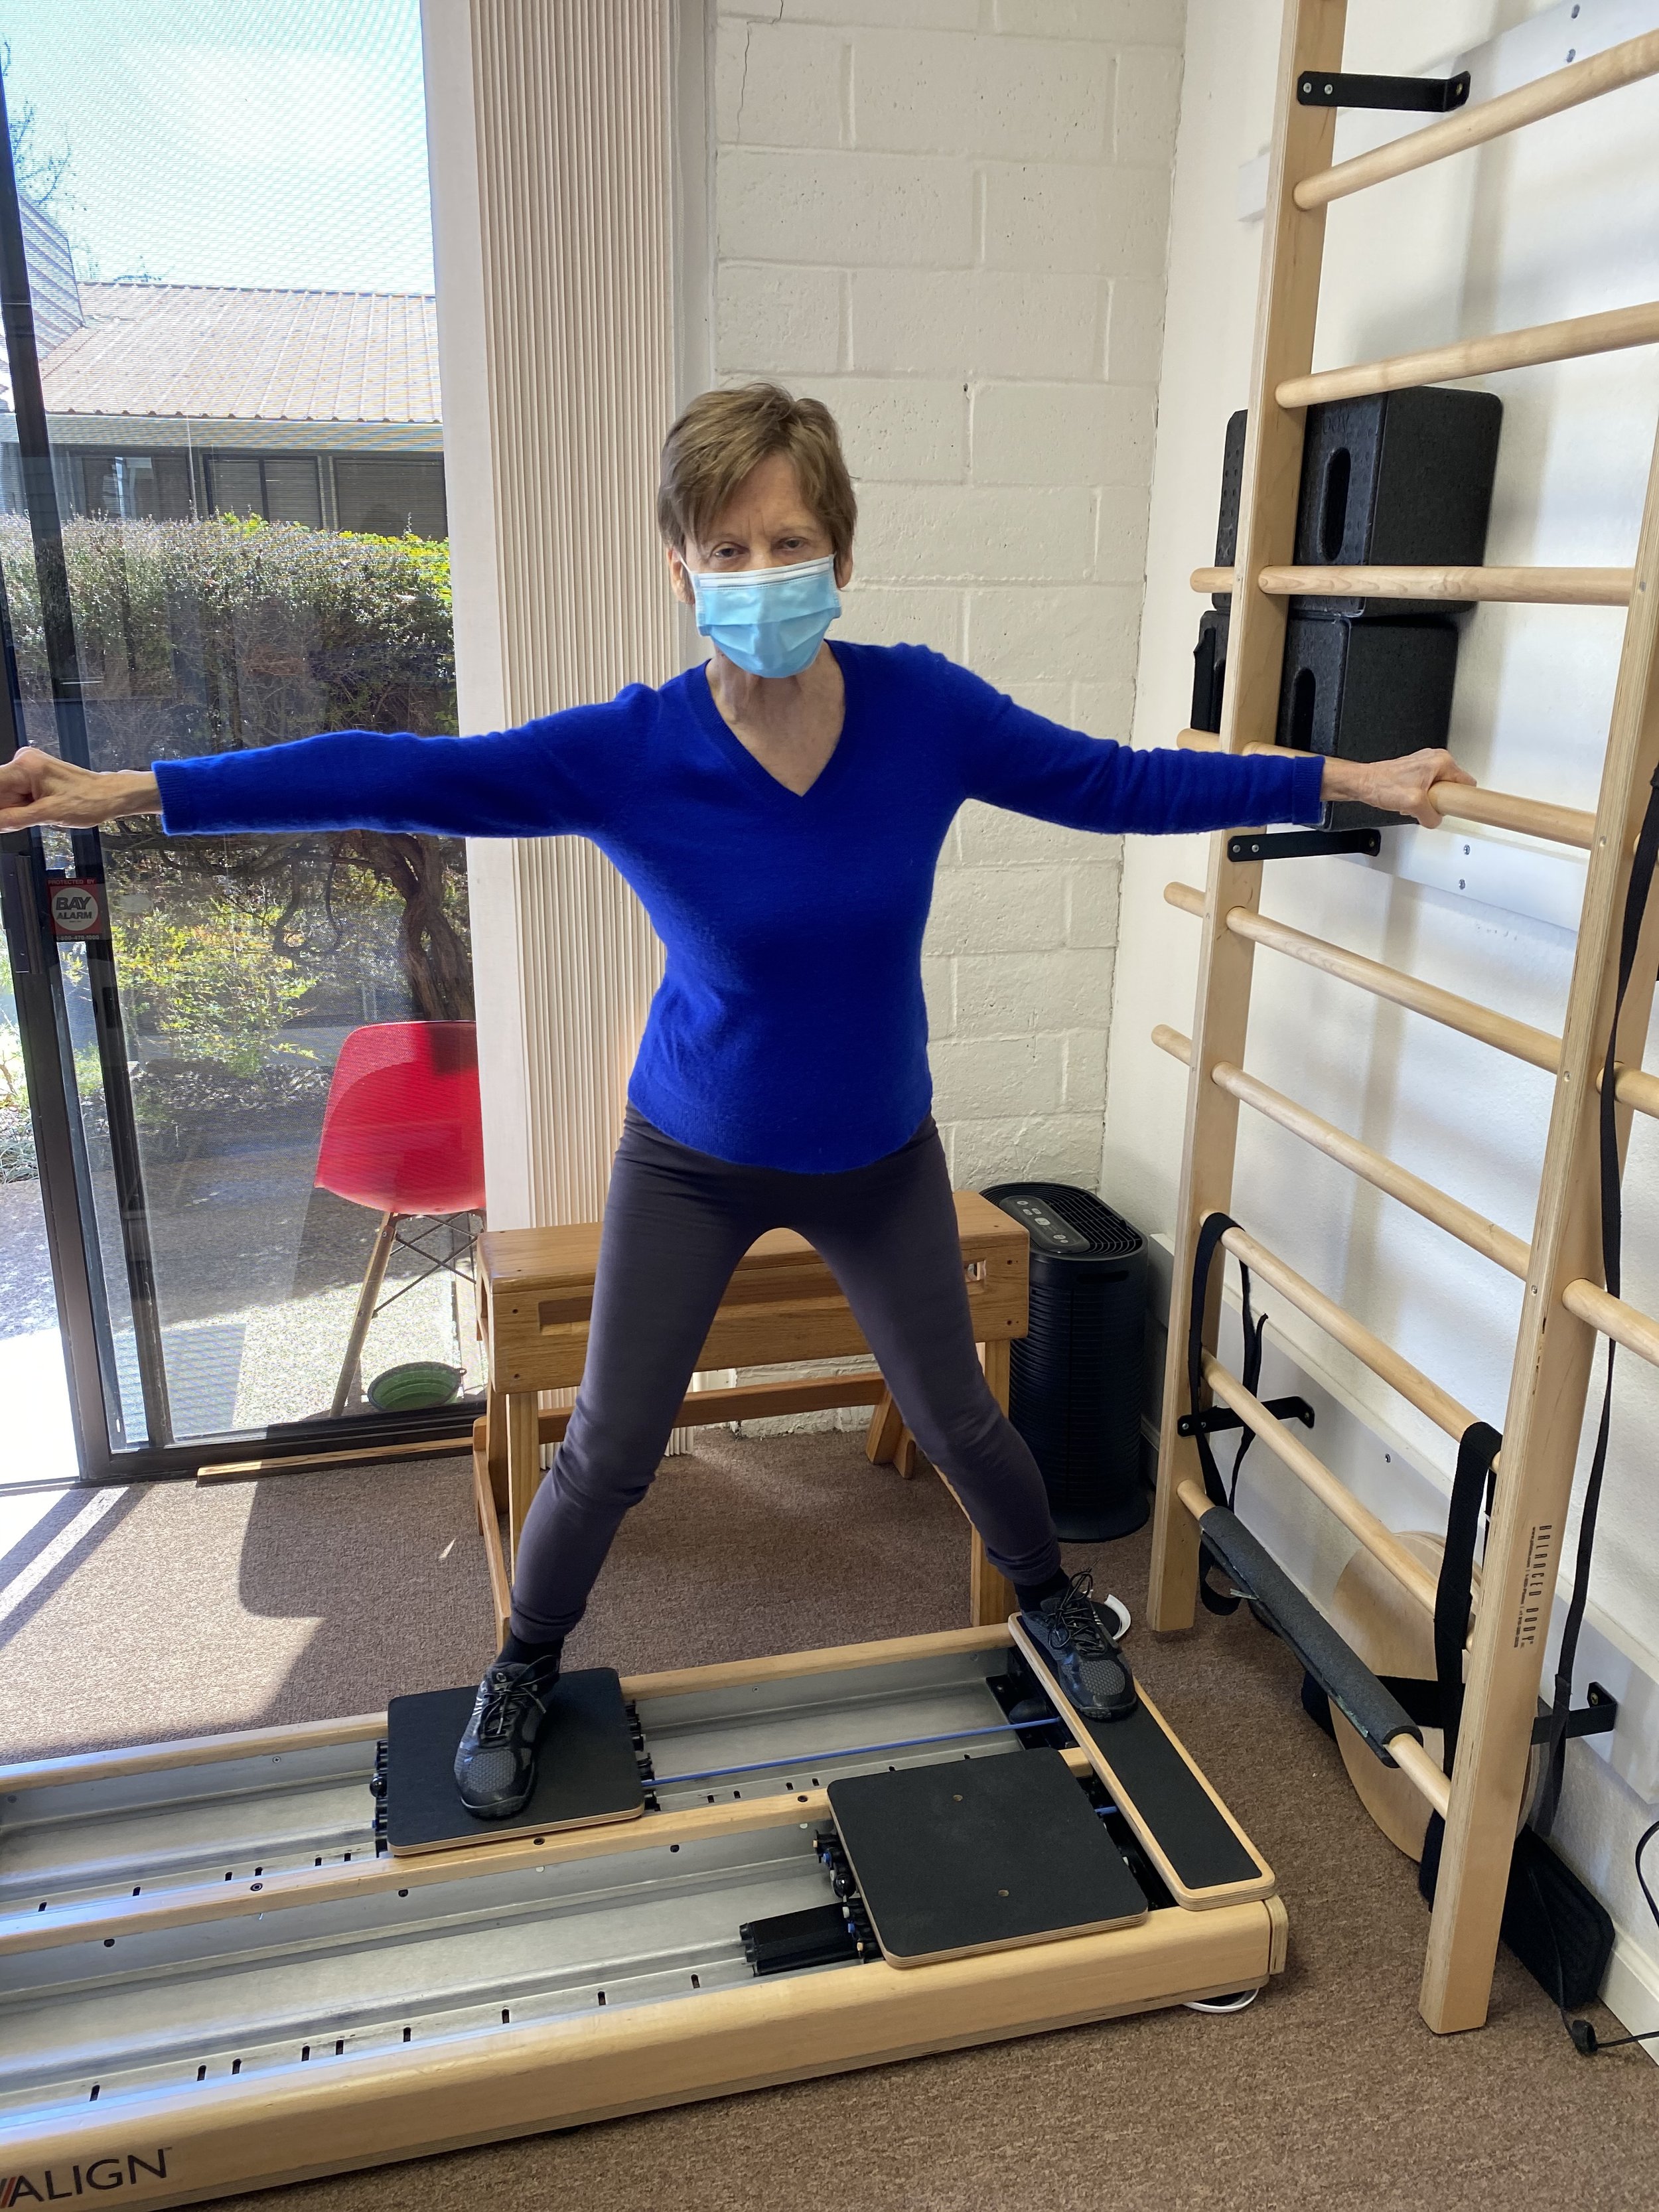
CoreAlign
Originally designed for gait instruction and re-patterning, the CoreAlign is a powerful tool for anyone working to improve walking mechanics. While most of the textbook exercises are done in standing, I’ve taken inspiration from other Pilates equipment and adapted Reformer exercises here, with even greater success in some cases, especially for folks who find the Reformer too challenging or unstable.
The setup is simple but smart: two carts sit in their own tracks and can be tensioned with resistance bands in either direction. A ladder (freestanding or wall-mounted) provides support for balance and can double as an anchor point for additional bands or straps.
Key Features:
Separate carts allow for reciprocal leg movement or isolated stance work
Smooth glide system with adjustable band tension—more controlled and accessible than DIY methods like sliding towels or skateboards
Multiple position options: standing on the carts, kneeling from behind, quadruped beside the tracks, and more
Ladder provides both support for standing work and anchor points for added feedback or resistance
How the CoreAlign supports movement exploration
Great for practicing stance leg support by stabilizing one cart while moving the other
Carts can move in rhythmic, reciprocal motion to simulate gait
The smooth, elastic movement allows for high repetitions, which is essential for motor re-patterning in gait training
As with the Reformer and Chair, band tension can either assist a lift or resist a push, depending on the setup


The CoreAlign is Best Suited For
Individuals who can reposition themselves accurately—alignment with the carts is important for optimal benefit
Those who can bear weight through their hands for prone or quadruped variations (note: loading through the elbows can feel a bit awkward here)
Anyone looking to develop gait rhythm, coordination, and fluidity
Considerations in practice
I added eyelet hooks to my ladder so I can secure a hip strap for extra support and safety—especially helpful for standing work
Because the carts move independently under the feet, users need a good connection through the quads (especially knee lockout) to support body weight in upright exercises
** This piece is severely underused in neuro-rehab spaces, and should be an ABSOLUTE investment for any neuro rehab facility training gait.
If I were building my SCI rehab studio from scratch…
I get asked all the time from people in the SCI community: “Should I get a Reformer for my clinic/my home?”
My answer: Probably not—at least not first.
As I mentioned earlier, the Reformer can be a powerful tool—but only for a specific subset of folks with spinal cord injury. Of all the Pilates equipment I use, it’s actually the least versatile.
If I had to rebuild my studio or set up a home practice for someone with SCI, here’s the order I’d invest:
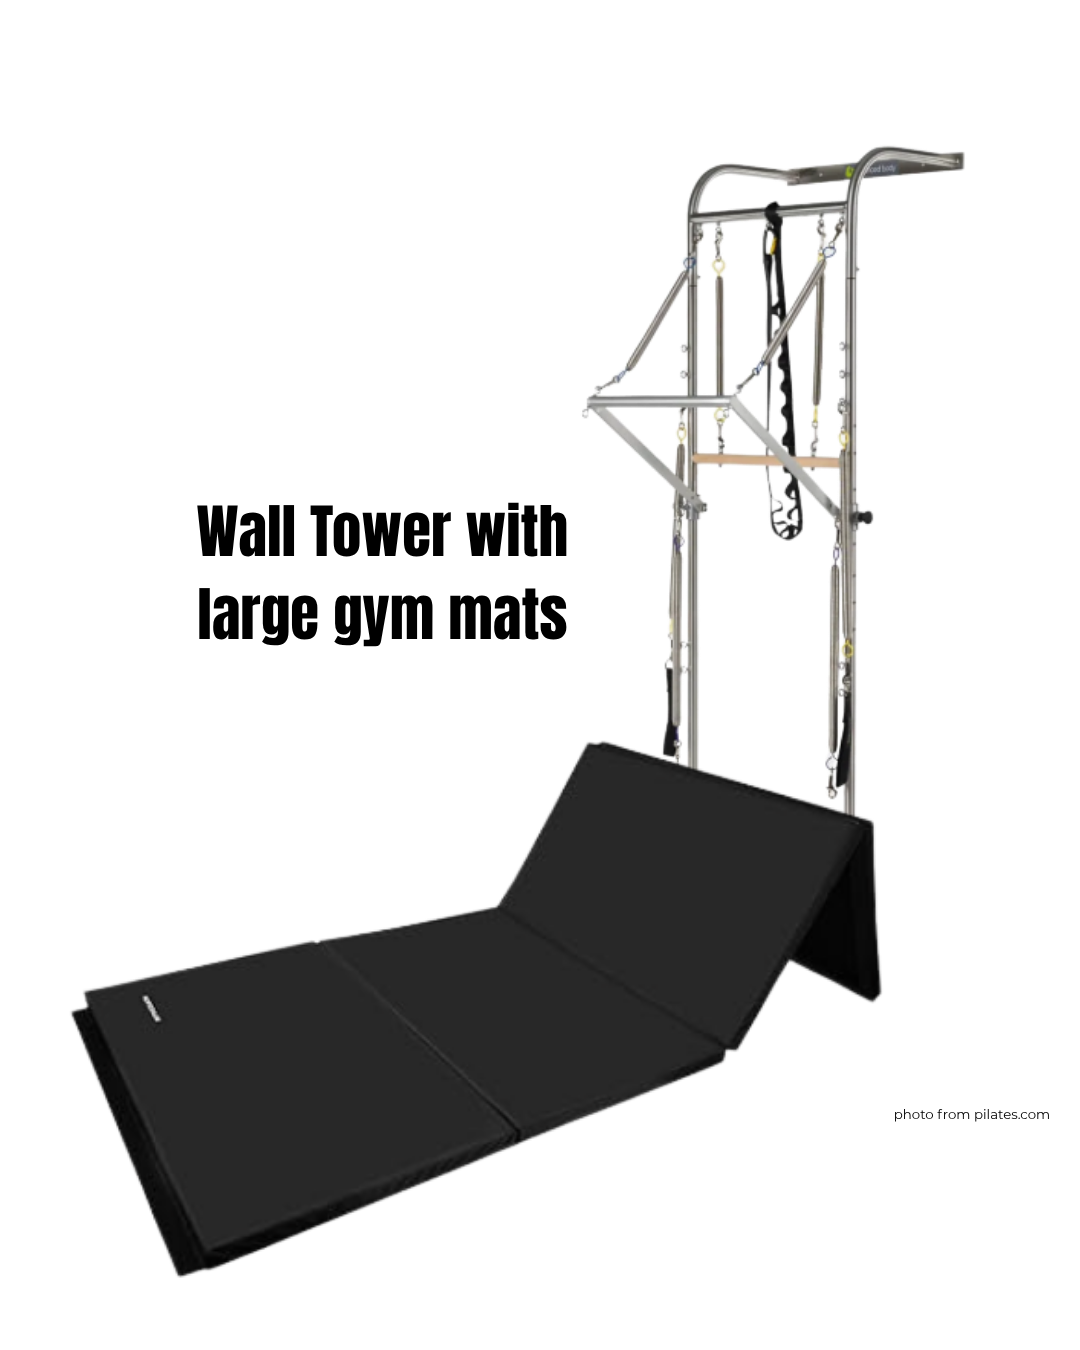
1. Wall Tower Unit with Push-Through Bar + Large Mats
With this setup, I’d have all the key spring and band attachment points. The large mat offers a wider surface, making it easier to roll and transition between positions compared to the narrow Trapeze Table. The only thing I’d be missing is the overhead canopy… but I’ve figured out a way to rig that on just a Tower unit (off the record 😉).
2. CoreAlign (or at least the base carts)
I would set this up just off the side of the mat for seated and quadruped work, or place it directly in front of the tower for standing practice. Perfect for standing and seated coordination, gait training, and cross-body integration, keeping in mind that the Tower’s upright posts double as a balance support for any of the standing exercises on the CoreAlign.
3. Reformer - Clinical height for easier transfers
Still one of my favorite tools for advanced postural work and leg activation, especially when working on finer details like eccentric control, pelvic motion, and load transfer. At #3, it’s just not the first thing I’d reach for in a general-purpose setup.


Reminder:
Mat First, Equipment Second
Joe Pilates designed the mat work first. The equipment was created to reform and refine what you do on the floor.
So, if you’re tempted to skip straight to the “fancy stuff,” don’t.
You’ll get more real-life carryover (and avoid a lot of frustration) by first developing strong foundations on the floor. The better your mat practice, the more meaningful your equipment practice becomes.
Check out my online floor foundations for SCI recovery program here.
The Tool Is Only as Good as the User
Pilates equipment can be incredible—but only if you know how to use it.
When I first started using Pilates equipment with clients, I hadn’t completed my formal Pilates Teacher training. I was doing okay without this education… but I wasn’t anywhere close to maximizing the potential of the equipment.

Investing in Pilates education changed everything for me and my clients. Since then, my understanding and creativity have grown, providing a much larger impact with every session.
If you already own equipment or are thinking about investing, I highly recommend investing in your education as well. Just as you wouldn’t purchase a Lokomat or FES bike without proper training, you probably shouldn’t work with Pilates equipment until you have a good understanding either.
Pilates education is 100% worth it—not only for optimizing your investment in the equipment, but for your safety and the safety of those you’re working with as well.
Entry-level clinical Pilates education
Online workshop series:Pilates Equipment for Neuro Rehab
Clinical in-service: Optimizing YOUR Pilates Equipment for SCI & Neuro
My 3-day Level 1 courses, especially the ones hosted at Pilates studio venues
My book, From the Ground Up, featuring 75 exercises using pilates equipment
Recommended formal pilates education schools:
Polestar Pilates (especially great for neuro-informed teaching)
Pilates manuals: Pilates by Rael Isacowitz is my favorite
Final Thoughts
Whether you’re a movement professional or someone with SCI exploring new ways to move, Pilates equipment can open doors to stability, strength, and creative freedom. But no single piece of gear is a magic fix—it’s how you use it that matters. Start with what supports your foundation, stay curious, and don’t underestimate what’s possible with a few springs, a solid setup, and an open mind.
Interested in learning more about how
Pilates Equipment and principles can support your SCI rehab program?
Check out my live in-person education offerings!
Online workshop series: Pilates Equipment for Neuro Rehab
Clinical in-service: Optimizing YOUR Pilates Equipment for SCI & Neuro
About the Author of this Artcle

Stephanie Comella
co-founder of Zebrafish Neuro
B.S. Exercise Biology
Nationally Certified Pilates Teacher (NCPT) - specializing in Spinal Cord Injury
Stephanie Comella has been working with individuals with spinal cord injuries since 2011. She blends her formal education in movement science, Pilates, and other mindful movement modalities with neurological science to provide an intuitive, hands-on style of teaching focused on body re-connection. Stephanie aims to empower both individuals with SCI and their trainers using a human-powered healing approach.
You can read her full bio here.